By Adson Costanzi Filho | April 1, 2021
Motivation
Recently I was introduced by some friends to the GitHub Actions and how it could help me execute tasks like: deploy my Shiny Apps, deploy this Blogdown, perform automated tests in packages, refresh data, and more. So, I decided to give it a try, and it was so simple and saved me so many work hours that I decided to write this post explaining how R developers can make good use of this amazing tool.
First the references I used to start on GitHub Actions:
Start with usethis
The easier and faster way to get started with the GitHub Actions in R is, for sure, using the usethis package! So, let’s first install it.
install.packages("usethis")The first very interesting function about the GitHub Action in the usethis package is the usethis::browse_github_actions() with this function you can see the active actions running in the most diverse R packages. This is a very good start to give you an idea of what are the Actions used in big R packages like “shiny”, “dplyr”, etc.
The usethis also have the usethis::use_github_action() function, which in my opinion is the easier way to start. It will create for you the necessary files/folders structure necessary for GitHub understands and runs your Actions, in other words, it will create the .github folder > workflows folder > .yaml file inside your current project path. This function also needs as argument a specific workflow name (you can check the available options here), depending on what option you choose it can give you a very good start point (sometimes you don’t need to change a thing). For example if you run usethis::use_github_action("pkgdown") it will create for you the default folder structure (.github folder > workflows folder > file.yaml) and it will start a .yaml file like this:
on:
  push:
    branches:
      - main
      - master

name: pkgdown

jobs:
  pkgdown:
    runs-on: macOS-latest
    env:
      GITHUB_PAT: ${{ secrets.GITHUB_TOKEN }}
    steps:
      - uses: actions/checkout@v2

      - uses: r-lib/actions/setup-r@v1

      - uses: r-lib/actions/setup-pandoc@v1

      - name: Query dependencies
        run: |
          install.packages('remotes')
          saveRDS(remotes::dev_package_deps(dependencies = TRUE), ".github/depends.Rds", version = 2)
          writeLines(sprintf("R-%i.%i", getRversion()$major, getRversion()$minor), ".github/R-version")
        shell: Rscript {0}

      - name: Restore R package cache
        uses: actions/cache@v2
        with:
          path: ${{ env.R_LIBS_USER }}
          key: ${{ runner.os }}-${{ hashFiles('.github/R-version') }}-1-${{ hashFiles('.github/depends.Rds') }}
          restore-keys: ${{ runner.os }}-${{ hashFiles('.github/R-version') }}-1-

      - name: Install dependencies
        run: |
          remotes::install_deps(dependencies = TRUE)
          install.packages("pkgdown", type = "binary")
        shell: Rscript {0}

      - name: Install package
        run: R CMD INSTALL .

      - name: Deploy package
        run: |
          git config --local user.email "actions@github.com"
          git config --local user.name "GitHub Actions"
          Rscript -e 'pkgdown::deploy_to_branch(new_process = FALSE)'
We will cover the presented steps inside the .yaml file later, as well as present some specific workflows for:
Deploy your shiny on shinyapps.io automatically
Deploy your blogdow page on GitHub Pages automatically.
Perform automatic tests on your R packages.
Schedule some routines.
Remember, the GitHub will only execute the .yaml files inside the workflows folder (which is inside the .github folder)!
Automatic Shiny Deploy
How amazing would it be if every time you “push” a new feature in your shiny repository on GitHub it automatically performed the deployment procedures to bring the new version of your app online on shinyapps.io? Thanks to GitHub Actions it is now possible!
Before we start to make an Action procedure to deploy your shiny apps on shinyapps.io we must create the folder structure GitHub needs. So, let’s create the .github folder and inside it we should create the workflows folder and only then we can start our .yaml file.
Now that we have the structure we can start developing our deployment procedure. The first thing to do is to define which trigger we want to use to “activate” the GitHub Action. Let’s say we want GitHub to execute this every time we push on the master branch. So, our file should start like this:
# Triggered on push branch master
on:
  push:
    branches: [ master ]
The second step is to define the name of the workflow and the operational system you want. GitHub actions has several OS options to choose including the 3 most popular ones ubuntu, macos and windows. I am going to name our procedure as “Shiny-Deploy” and we are going to use the macos-10.15.
You can associate your actions to badges with the
usethispackage. For example, if the name of your workflow is “Shiny-Deploy” you can add this badge in your README file runingusethis::use_github_actions_badge("Shiny-Deploy").
# Name of the workflow - usethis::use_github_actions_badge("Shiny-Deploy")
name: Shiny-Deploy

# Set the job, the machine and the R version
jobs:
  Shiny-Deploy:
    runs-on: macos-10.15
    strategy:
      matrix:
        r-version: [4.0.2]
Now that we already have our GitHub Actions machine we can start developing the steps! Let’s first clone the repository from the respective branch that has triggered the action.
PS: from now on all the actions will be “inside” the steps structure.
  steps:
        # Cloning your repository from the respective branch that has triggered it
      - uses: actions/checkout@v2
Nice! We already made a copy of our files, now we need to set-up the R installation in our GitHub Actions machine to be able to run our R scripts. We will also set-up the pandoc to compile our shiny or Rmarkdown scripts.
        # set-up an R installation in our GHA machine to run our scripts
      - name: Set up R ${{ matrix.r-version }}
        uses: r-lib/actions/setup-R@v1 # for macos
        with:
          r-version: ${{ matrix.r-version }}
        # We will also need pandoc to compile our Shiny or RMarkdown report
      - name: Setting up pandoc
        uses: r-lib/actions/setup-pandoc@v1
From now on we can execute some R scripts directly in the shell of our GitHub Actions machine. Therefore, our next step will be to install all the packages your shiny app needs. Obviously, this step will change depending on what packages you used to build your app.
Don’t forget to include the
rsconnectpackage! We are going to use this package to connect our GitHub machine to the shinyapps server.
        # Install R packages
      - name: Install dependencies
        run: |
          install.packages(c(
            "rsconnect",
            "dplyr",
            "shiny",
            "shinyjs",
            "shinyWidgets",
            "shinyalert",
            "shinycssloaders",
            "evaluate",
            "highr",
            "knitr",
            "markdown",
            "rmarkdown",
            "stringi",
            "stringr",
            "tinytex",
            "xfun"
          ))
        shell: Rscript {0}
Now comes the tricky part! In order to make the connection between your GitHub Actions machine and your shiny apps account we need to set your shiny apps token and key. Evidently, for security reasons you don’t want to publish you shinyapps credentials for everyone accessing your GitHub repository. However, we also need your token and keys to be able to deploy your app automatically, that is why we are going to use the GitHub Secrets feature!
First you need to go to your shiny apps account click in your profile name and enter in the tokes option.
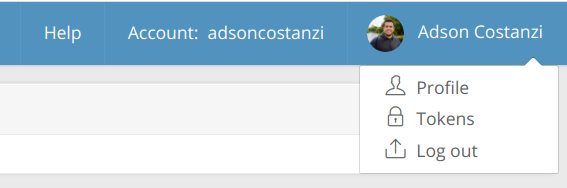
If you don’t have created your shinyapps tokens yet, or if you want to use a new one, you can click on the + Add Token button. Once you did that a new line will appear and you should be able to see your Token but not your Secret. You need to press the Show button followed by the Show Secret to be bale to copy your Secret credential.
Now we need to include this credentials on GitHub Secrets! To do that you need to enter in your GitHub repository page and go to Settings.

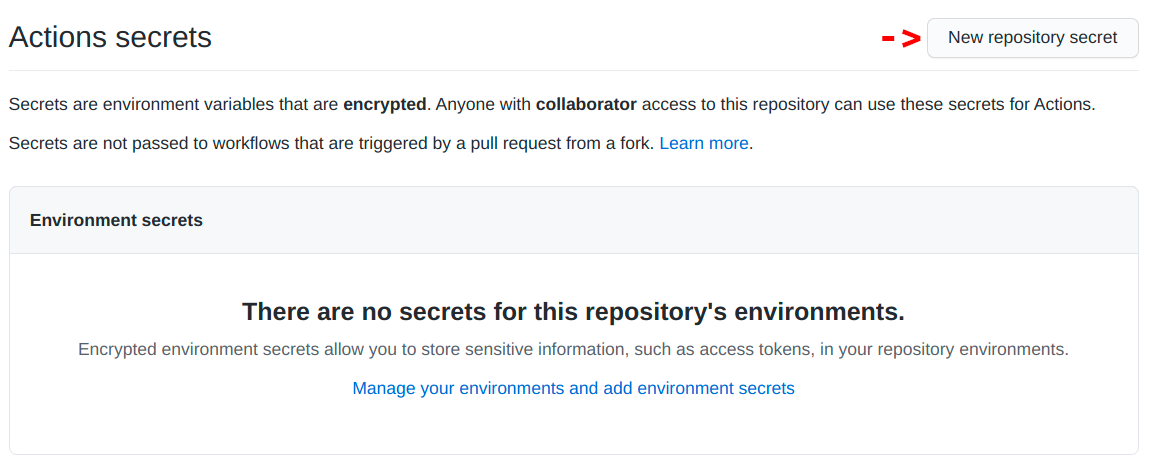
On the left menu you should be able to see the Secrets option. Once you enter in the Secrets tab you will see the title “Actions secrets”, and just on its side you will see the “New repository secret” button. You need to click this button to create your encrypted environment variables (in this case your shinyapps credentials).
We are going to create 2 different environment variables, the first named “SHINYAPP_TOKEN” and the second named “SHINYAPP_SECRET” (of course you can set any name you want). Once you clicked on the “New repository secret” button you will need to provide the name of your variable and the value of it and press “Add Secret”, as you can see below.
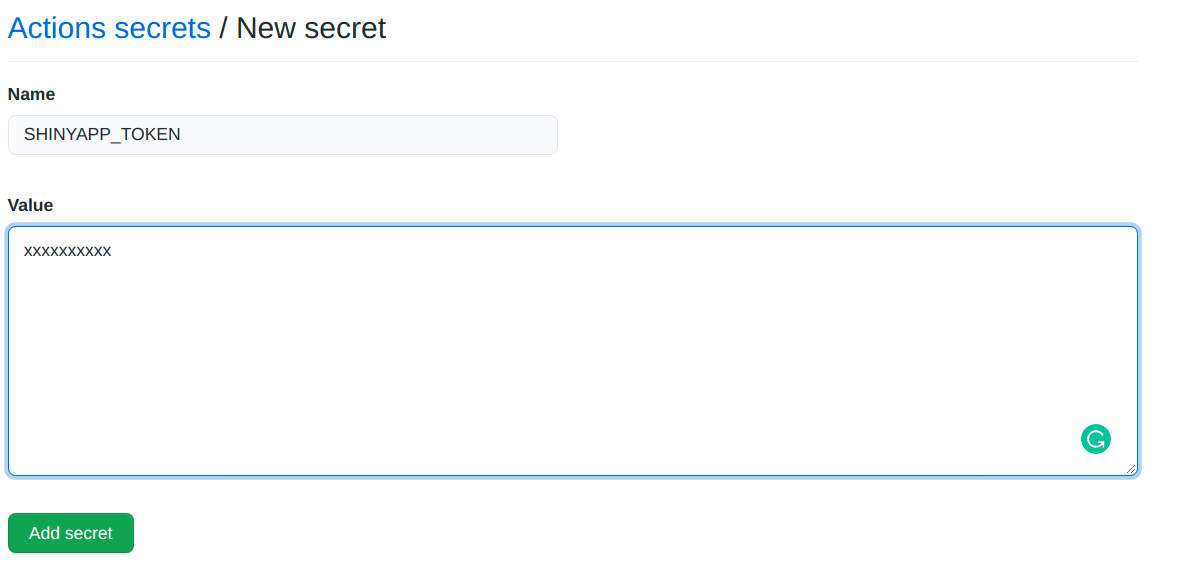
Your Secret and Token don’t need to be in quotes (“my token”)!
Ok, now we can use these two variables inside our .yaml file, and we should be able to deploy our app on the shinyapps server! You also must provide your shinyapps account name, your app name, and the directory of your app scripts. Sure you can set all this using the GitHub Secrets if you want.
        # Connect on shinyapps server
      - name: Connect to ShinyApps
        env:
          # set the shinyapps keys as environment variables
          SHINY_TOKEN: ${{ secrets.SHINYAPP_TOKEN }}
          SHINY_SECRET: ${{ secrets.SHINYAPP_SECRET }}
        run: |
          shiny_token = Sys.getenv("SHINY_TOKEN")
          shiny_secret = Sys.getenv("SHINY_SECRET")
          rsconnect::setAccountInfo(name = 'adsoncostanzi', token = shiny_token, secret = shiny_secret)
        shell: Rscript {0}
        # deploy the app on shinyapps server
      - name: Deploy to shinyapps.io
        run: |
          rsconnect::deployApp(appName = "soothsayeR", appDir = "app")
        shell: Rscript {0}
That’s it, now the GitHub will deploy your shiny on shinyapps any time you “push” on the master branch!
For reasons of copy and paste, here is the full .yaml file!
Follow the indentation, it is an essential part of the code!
# Triggered on push branch master
on:
  push:
    branches: [ master ]

# Name of the workflow - usethis::use_github_actions_badge("Shiny-Deploy")
name: Shiny-Deploy

# Set the job, the machine and the R version
jobs:
  Shiny-Deploy:
    #runs-on: ubuntu-latest
    runs-on: macos-10.15
    strategy:
      matrix:
        r-version: [4.0.2]

    steps:
        # Cloning your repository from the respective branch that has triggered it
      - uses: actions/checkout@v2
        # set-up an R installation in our GHA machine to run our scripts
      - name: Set up R ${{ matrix.r-version }}
        uses: r-lib/actions/setup-R@v1 # for macos
        with:
          r-version: ${{ matrix.r-version }}
        # We will also need pandoc to compile our Shiny or RMarkdown report
      - name: Setting up pandoc
        uses: r-lib/actions/setup-pandoc@v1
        # Install R packages
      - name: Install dependencies
        run: |
          install.packages(c(
            "rsconnect",
            "dplyr",
            "shiny",
            "shinyjs",
            "shinyWidgets",
            "shinyalert",
            "shinycssloaders",
            "evaluate",
            "highr",
            "knitr",
            "markdown",
            "rmarkdown",
            "stringi",
            "stringr",
            "tinytex",
            "xfun"
          ))
        shell: Rscript {0}
        # Connect in shinyapps server
      - name: Connect to ShinyApps
        env:
          # set the shinyapps keys as environment variables
          SHINY_TOKEN: ${{ secrets.SHINYAPP_TOKEN }}
          SHINY_SECRET: ${{ secrets.SHINYAPP_SECRET }}
        run: |
          shiny_token = Sys.getenv("SHINY_TOKEN")
          shiny_secret = Sys.getenv("SHINY_SECRET")
          rsconnect::setAccountInfo(name = 'adsoncostanzi', token = shiny_token, secret = shiny_secret)
        shell: Rscript {0}
        # deploy the app on shinyapps server
      - name: Deploy to shinyapps.io
        run: |
          rsconnect::deployApp(appName = "soothsayeR", appDir = "app")
        shell: Rscript {0}
Automatic Blogdown Deploy
What about make your blogdown deploy automatic on GitHub Pages? Every time you write a new post you will only need to “push” and the GitHub Actions will take care of the rest! This procedure works very similar to the shiny one, so let’s start our .yaml file!
For the blogdwon deploy purpose we are going to use two different branches: The first one named “source” that will contain the development side of our blogdown. And the “master” branch that will expose the built page (the master branch will receive the result of blogdown::build_site(local = FALSE)).
The master branch MUST be the one with the
build_site()content!
This way we will set our trigger as a “push” on the “source” branch:
# Triggered on push branch source
on:
  push:
     branches:
       - source
In the next step, we will define the workflow name and the OS we want to use. For this example, we are going to name our workflow as “deployblog” and the OS will be an Ubuntu 18.04.
# Name of the workflow - usethis::use_github_actions_badge("deployblog")
name: deployblog

# Set the job, the machine
jobs:
  deployblog:
    name: Render and deploy blogdown
    runs-on: ubuntu-18.04
The easier part is done, now let’s start the steps! So, we are going to clone the repository (on the “source” branch), and set up R and pandoc, as we did on the shiny deploy session.
PS: from now on all the actions will be “inside” the steps structure.
    steps:
      # Cloning your repository from the respective branch that has triggered it
      - uses: actions/checkout@v2
        with:
          submodules: true
          fetch-depth: 0
        # set-up an R installation in our GHA machine to run our scripts
      - uses: r-lib/actions/setup-r@v1
        # We will also need pandoc to compile our Shiny or RMarkdown report
      - uses: r-lib/actions/setup-pandoc@v1
Now that we have our scripts and the R settled up we can proceed with the package installation, as well as install HUGO, as follows:
     # Install R packages
      - name: Install r packages
        run: |
          Rscript -e 'install.packages(c("remotes", "rmarkdown"))' \
                  -e 'remotes::install_github("rstudio/blogdown")'
      - name: install hugo
        # Install Hugo
        run: Rscript -e 'blogdown::install_hugo(extended = TRUE, version = "0.78.2")'
      - name: Get themes
        run: git submodule update --remote
That finished we must be able to render/build our blogdown in a specific folder (in this case will be the “public” folder) using the blogdown::build_site(local = FALSE) function. That done we just need to push the content of the “public” folder to the master branch and your blogdown will be online on GitHub Pages!
      - name: Look at files
        run: ls ./public
      - name: Render blog
        run: Rscript -e 'blogdown::build_site(local = FALSE)'
      - name: Deploy
        uses: peaceiris/actions-gh-pages@v3
        with:
          github_token: ${{ secrets.GITHUB_TOKEN }}
          publish_branch: master
I STOLE THIS SCRIPT FROM MY GOOD FRIEND LUCAS GODOY (he also taught me how to make it work)!
For reasons of copy and paste, here is the full .yaml file!
# Triggered on push branch source
on:
  push:
     branches:
       - source

# Name of the workflow - usethis::use_github_actions_badge("deployblog")
name: deployblog

# Set the job, the machine
jobs:
  deployblog:
    name: Render and deploy blogdown
    runs-on: ubuntu-18.04
    steps:
      # Cloning your repository from the respective branch that has triggered it
      - uses: actions/checkout@v2
        with:
          submodules: true
          fetch-depth: 0
        # set-up an R installation in our GHA machine to run our scripts
      - uses: r-lib/actions/setup-r@v1
        # We will also need pandoc to compile our Shiny or RMarkdown report
      - uses: r-lib/actions/setup-pandoc@v1
        # Install R packages
      - name: Install r packages
        run: |
          Rscript -e 'install.packages(c("remotes", "rmarkdown"))' \
                  -e 'remotes::install_github("rstudio/blogdown")'
      - name: install hugo
        # Install Hugo
        run: Rscript -e 'blogdown::install_hugo(extended = TRUE, version = "0.78.2")'
      - name: Get themes
        run: git submodule update --remote
      - name: Look at files
        run: ls ./public
      - name: Render blog
        run: Rscript -e 'blogdown::build_site(local = FALSE)'
      - name: Deploy
        uses: peaceiris/actions-gh-pages@v3
        with:
          github_token: ${{ secrets.GITHUB_TOKEN }}
          publish_branch: master
          publish_dir: ./public
Automatic Tests
I would say that execute tests manually can be the most time-consuming job presented in this post, and that is why performing automatic tests can save you lots of work hours! I know that automatic tests are very specific, in other words, it will depend on what kind of tests you want to perform. However, we can have a very good start point with the usethis package!
For example, by running the usethis::use_github_action_check_full() function it will create the default R-CMD-check procedure for you in a GitHub Actions structure. The R-CMD-check will stimulate the usage of your codes on the most diverse environments, such as on windows, ubuntu and, macos, all the three running different R versions as well. My advise is use as a start point the .yaml provided by the usethis::use_github_action_check_full() function to perform your own automatic tests.
You can find below the .yaml file generated by the usethis::use_github_action_check_full() function:
on:
  push:
    branches:
      - main
      - master
  pull_request:
    branches:
      - main
      - master

name: R-CMD-check

jobs:
  R-CMD-check:
    runs-on: ${{ matrix.config.os }}

    name: ${{ matrix.config.os }} (${{ matrix.config.r }})

    strategy:
      fail-fast: false
      matrix:
        config:
          - {os: macOS-latest,   r: 'release'}
          - {os: windows-latest, r: 'release'}
          - {os: windows-latest, r: '3.6'}
          - {os: ubuntu-18.04,   r: 'devel', rspm: "https://packagemanager.rstudio.com/cran/__linux__/bionic/latest", http-user-agent: "R/4.0.0 (ubuntu-18.04) R (4.0.0 x86_64-pc-linux-gnu x86_64 linux-gnu) on GitHub Actions" }
          - {os: ubuntu-18.04,   r: 'release', rspm: "https://packagemanager.rstudio.com/cran/__linux__/bionic/latest"}
          - {os: ubuntu-18.04,   r: 'oldrel',  rspm: "https://packagemanager.rstudio.com/cran/__linux__/bionic/latest"}
          - {os: ubuntu-18.04,   r: '3.5',     rspm: "https://packagemanager.rstudio.com/cran/__linux__/bionic/latest"}
          - {os: ubuntu-18.04,   r: '3.4',     rspm: "https://packagemanager.rstudio.com/cran/__linux__/bionic/latest"}
          - {os: ubuntu-18.04,   r: '3.3',     rspm: "https://packagemanager.rstudio.com/cran/__linux__/bionic/latest"}

    env:
      RSPM: ${{ matrix.config.rspm }}
      GITHUB_PAT: ${{ secrets.GITHUB_TOKEN }}

    steps:
      - uses: actions/checkout@v2

      - uses: r-lib/actions/setup-r@v1
        id: install-r
        with:
          r-version: ${{ matrix.config.r }}
          http-user-agent: ${{ matrix.config.http-user-agent }}

      - uses: r-lib/actions/setup-pandoc@v1

      - name: Install pak and query dependencies
        run: |
          install.packages("pak", repos = "https://r-lib.github.io/p/pak/dev/")
          saveRDS(pak::pkg_deps("local::.", dependencies = TRUE), ".github/r-depends.rds")
        shell: Rscript {0}

      - name: Restore R package cache
        uses: actions/cache@v2
        with:
          path: |
            ${{ env.R_LIBS_USER }}
            !${{ env.R_LIBS_USER }}/pak
          key: ${{ matrix.config.os }}-${{ steps.install-r.outputs.installed-r-version }}-1-${{ hashFiles('.github/r-depends.rds') }}
          restore-keys: ${{ matrix.config.os }}-${{ steps.install-r.outputs.installed-r-version }}-1-

      - name: Install system dependencies
        if: runner.os == 'Linux'
        run: |
          pak::local_system_requirements(execute = TRUE)
          pak::pkg_system_requirements("rcmdcheck", execute = TRUE)
        shell: Rscript {0}

      - name: Install dependencies
        run: |
          pak::local_install_dev_deps(upgrade = TRUE)
          pak::pkg_install("rcmdcheck")
        shell: Rscript {0}

      - name: Session info
        run: |
          options(width = 100)
          pkgs <- installed.packages()[, "Package"]
          sessioninfo::session_info(pkgs, include_base = TRUE)
        shell: Rscript {0}

      - name: Check
        env:
          _R_CHECK_CRAN_INCOMING_: false
        run: |
          options(crayon.enabled = TRUE)
          rcmdcheck::rcmdcheck(args = c("--no-manual", "--as-cran"), error_on = "warning", check_dir = "check")
        shell: Rscript {0}

      - name: Show testthat output
        if: always()
        run: find check -name 'testthat.Rout*' -exec cat '{}' \; || true
        shell: bash

      - name: Upload check results
        if: failure()
        uses: actions/upload-artifact@main
        with:
          name: ${{ matrix.config.os }}-r${{ matrix.config.r }}-results
          path: check
Scheduled Routines
GitHub Actions also provides the option of schedule routines, in other words, you can define as triggers any specific time you want. To do that GitHub Actions uses the cron syntax, that is the hard part (at least for me who had never used it). First, let’s understand the syntax GitHub Actions uses to run the scheduled routines!
The cron syntax is divided in 5 pieces (*****):
The first peace is to define the minute (0 - 59)
The second peace is to define the hour (0 - 23)
The third peace is to define the day of the month (1 - 31)
The fourth peace is to define month (1 - 12)
The fifth peace is to define the day of the week (0 - 6)
Obviously, you don’t want to run your routine just once! So, you need some way to abstract some of the pieces, in the con syntax, it is by using an asterisk (*). For example, the ***** means run the routine every minute every day!
Kip in mind that the GitHub times are based on UTC!
Here there are some helpful examples I took from this post:
# Every Monday at 1PM UTC (9AM EST)
0 13 * * 1

# At the end of every day
0 0 * * *

# Every 10 minutes
*/10 * * * *
What about the .yaml syntax? It is very simple, instead of using the “on” followed by “push”, “merge”, “pull_request”, etc., you should write “schedule” and it is done!
on:
  schedule:
    - cron: '0 0 * * *'
That is all
I hope someone finds this tutorial useful. As always your feedback is much appreciated, feel free to get in touch with me over social media! 😄