By Adson Costanzi Filho | March 17, 2021
Motivation
If you are using a script more than 3 times it is time to create a function and if you are using a function in 3 different projects it is time to create a package. “I heard it from someone, but I don’t remember who..”
Recently I experienced the whole flow to create a new R package with the help of amazing packages like devtools, usethis, pkgdown, and roxygen2. That is why I decided to write about it while I still remember all the necessary steps to make your local functions available for the R community (CRAN and Github).
The material I followed to guide me through this process was the R Packages Book by Hadley Wickham. Of course, there is MUCH MORE content in his book than the one presented here, but maybe this post can also help someone in some way.
Functions
A package is nothing more than a bunch of functions together in the same place (sharing the same scope), so the main key to having a good package is also to have good functions.
This post will not cover the guidelines to create useful functions. For that I recommend you to take a look on the Functions section of the Advanced R Book.
In order to make the next steps easier for you to pack your functions, it is important to keep in mind two things:
First, develop your functions the more generic as possible, and always include comments explaining the inputs, outputs and at least one example on how to use it.
Second, remember all the packages you used and if possible always use the
package::functionstructure when using foreigners functions inside your own one.
PS: Be careful with those packages we always use but usually we forget about because “they were always there”, such as stats and utils.
The base R is the only one that don`t need to be mentioned!
Now that we have our functions in a good shape let`s move to the package development itself.
How to start
The first thing to do is to install the packages that will make our life easier.
install.packages(c("devtools", "usethis", "pkgdown", "roxygen2"))If you also want to share your package on Github, now it is a good time to create a new Github repository with the name you want to call your package, for example ‘mypackage’. Clone this empty repository inside some folder you want.
Now it should be possible to run the command devtools::create("~/path/mypackage")(give the path of the Github repository you just cloned). This line of code will create the folders and files structure we are going to follow from now on. As soon as you run it a new RStudio session in an R project structure will prompt and it will set you inside the “~/path/mypackage” folder. If everything went well you must be able to see a folder called “R”, and the “DESCRIPTION” and “NAMESPACE” files.
R folder: The R folder will be the place where you should put your scripts (which contains your functions, the .R files). There isn’t a rule on how you should organize your scripts inside this folder, however I like to follow the one function per script rule. For me, having one function per script structure makes the process of debugging and documentation easier. But at the end it is up to you!
DESCRIPTION: This file will expose some important information about your package. It is not that challenge to fill the main options inside this file, indeed the file has very good explanations on how to fill it correctly. Also we have functions like
usethis::use_package("packagename")to help us on how to fill the other sections of this file. We will talk more about it later.NAMESPACE: This file brings all the functions the user of your package will be able to use (all those functions defined with a
@export. We also will cover more about it later). You should not edit this file, instead, you can rundevtools::document()to update it.
Function Documentation
Now it is time to document your functions. This step is really important to make your package useful for the R community and to help the proper usage of each one of your functions. To do that we are going to use the roxygen2 package.
Thanks to roxygen2 package the documentation process is more simple than ever. If you are on RStudio you can simple open the script which contains your function, position the cursor in the begin of your function and go to the Code menu > Insert Roxygen Skeleton or ctrl+shift+alt+R. If everything went well you should see an output like this:
#' Title
#'
#' @param a
#' @param b
#'
#' @return
#' @export
#'
#' @examples
myfunction <- function(a,b)
{
  return(a+b)
}
Now it is only a matter of fill the presented options with clear explanations regarding the use of the function and parameters. In addition, you must provide at least one example of how to use it and explain what the user should expect in return.
Sometimes the example we provided will only work in very specific conditions. For these cases you should create your examples inside the
\dontrun{}, it will prevent the execution of it while compile and check your package.
Note that the default skeleton roxigen2 provides us considers the #' @export. It only means that this function will be exposed to the end user, in other words the user should be able to run mypackage::myfunction(). If for some reason you don’t want to export this function you can only remove this line from your script.
Functions defined without the
#' @exportwill work internally with no problems, but the end user will be able to access it only with the:::structure, likemypackage:::myfunction().
At the end of this process your function script should be something like this:
#' My Function
#'
#' This function provides the sum of two values (the worst example ever, I know!).
#'
#' @param a the first numeric value
#' @param b the second numeric value
#'
#' @return a numeric value with the sum of a + b
#' @export
#'
#' @examples
#' \dontrun{
#' ## the parameters must be numeric
#'
#' myfunction(a = 1, b = 1)
#' }
myfunction <- function(a,b)
{
  return(a+b)
}
Once you have your function documented you should run devtools::document() this will create/update the folder called “man”. This folder will store all your functions documentations. Don’t forget to run devtools::document() every time you update your functions descriptions!
You can also run devtools::load_all() to load your package in your current R session, than you should be able to see how your documentation looks like by running help('mypackage::myfunction') or ?mypackage::myfunction.
Foreigner Packages
It is very unlikely that you will create your functions without using ANY dependencies (foreigner packages), and that is not a problem at all. However you must provide this information for the end user in some way, otherwise, the users will not be able to run your codes as expected.
The right place for this information is inside the DESCRIPTION file in the “Imports” section. It is possible to fill this by hand by opening the DESCRIPTION file and including all the packages you used in your functions (separated by “,”) OR you can use the function usethis::use_package("ggplot2") and it will take care of filling it for you.
The
use_packagefunction also provides options like the minimum pakage version and the type of dependency.
DO NOT USE library() OR require() IN YOUR R SCRIPTS!!!
One other possibility is to include just one function from a foreigner package. This is very common because sometimes we used only one function from a specific package and we don’t want to “import” the whole package but only that one function we are using. For that you can include @importFrom package_name function_name in the documentation of your function, this way you should be able to use the function without declare the package it came from. From now on it will be available like your own functions mypackage::function_name().
Let’s say we want to include the beep() function from the beepr package, but we don’t want the whole beepr. The script should be something like this:
#' My Function
#'
#' This function provides the sum of two values (the worst example ever, I know!).
#'
#' @param a the first numeric value
#' @param b the second numeric value
#'
#' @return a numeric value with the sum of a + b
#' @export
#'
#' @importFrom beepr beep
#'
#' @examples
#' \dontrun{
#' ## the parameters must be numeric
#'
#' myfunction(a = 1, b = 1)
#' }
myfunction <- function(a,b)
{
  beep()
  return(a+b)
}
From now one the beep() function should be part of mypackage. If you run devtools::document() and devtools::load_all() you will see that mypackage::beep() is going to work.
It is also very common to use the %>% operator inside your functions. As we know the pipe operator is from the magrittr package but it is not necessary to import the whole magrittr package to only use the %>%. For this you can run the usethis::use_pipe() and that is it!
Including Data
What if my package uses external data? That other very common possibility and it is very easy to include external data sources in your package. Thanks again to the usethis package for provide us the use_data() function! So, to make your external data available inside your function environment you just need to run usethis::use_data(mydf), like this:
mydf <- data.frame(
  x = rnorm(10,0,1),
  y = runif(10)
)

usethis::use_data(mydf)
From now on you should be able to use the “mydf” data frame inside your functions without problems.
Just like functions data objects also must be documented, and the idea is almost the same as documenting your functions. First, open a new R script and save it inside the R folder with the name you want (my advise is to follow the name of your data). Then you can follow the structure presented bellow.
#' Random values
#'
#' A completely useless data set.
#'
#'
#' @format A data frame with 10 rows and 2 variables:
#' \describe{
#'   \item{x}{10 values from a normal distribution with mean = 0 and sd = 1}
#'   \item{y}{10 values from a uniform distribution}
#'   ...
#' }
#' @source Created by the author.
"mydf"
Once you finish this process you can run devtools::document() and a new file named like your data will be created inside the “man” folder. To actually see the result of your documentation just run devtools::load_all() and then you should be able to run help(mypackage::mydf).
Never
@exporta data set!
Creating Vignettes
The Vignettes are an important part of the package development process because it is the space for you to actually make a “walking through” your package capabilities. It is important to highlight that you can create as many vignettes as you like!
Starting a new Vignette is really simple, you just need to run devtools::use_vignette("intro"). It will create a new folder called “vignettes” and inside this folder, you can see a file named “intro.Rmd”. The “intro.Rmd” is at the end a standard Rmarkdown file, now you can create the content of it the way you like.
If you need some help with the
rmarkdownpackage my advice is to take a look at the Rmarkdown Book!
Creating README
As the idea is also to make the package available on Github it is almost mandatory to have a good README section. Thinking on that (AGAIN) the usethis package has the usethis::use_readme_rmd() function to help us organize our README file. Now it is only a matter of opening the file created by the usethis::use_readme_rmd() following the structure and including whatever you want.
Remember to Knit any time you changed something on the README file!
It is a good idea to take a look in other packages repositories on Github to get inspiration.
To include the badges you can use the
usethispackage (ex:usethis::use_badge(),usethis::use_cran_badge(), etc).
CRAN Submission
Now it is time to update your package on the main R repository the Comprehensive R Archive Network, CRAN. All the work we have done so far is essential to have your package accepted on CRAN repository.
The first thing to do is be in accordance with the CRAN Repository Policy. Here you will find the rules and guidelines to follow to have your package hosted by CRAN. The next step is to fill the web form.
Spoiler Alert: The web form will request you to provide your package in a .tar.gz file, and also they will run some automatic routines to verify if your package is in a good shape to be review by someone on CRAN. Before we “build” your package in a .tar.gz format let’s take a look if our package will pass the CRAN’s automatic tests. To simulate the CRAN’s check procedure you can run the devtools::check(), it should provide you a good idea if your package is ready to be hosted by CRAN.
Now that you have a package with 0 errors 0 warnings and 0 notes it is time to actually build the package in the .tar.gz. The simple way to do that is by running the devtools::build() and that’s it! Your package now is ready to be submitted on CRAN! Follow the steps presented on the web form, and be aware of your email (all the communications about your package status will be over email).
For the next version of your pacakge you can use the
devtools::release()!
pkgdown
Now that our package is available on Github and on CRAN we can easily create its own page, like a pro! Thanks to pkgdown it is very simple to make a very beautiful page to spreading your package for the whole R community.
I will not gona cover the whole functionality of
pkgdownfor that you can see the pkgdown page!
Since we already have the package structure the only thing to do to create your packages’ page is:
# Run to configure package to use pkgdown (once)
usethis::use_pkgdown()

# Run to build the website (every time you change it)
pkgdown::build_site()
I told you that this is the easier part! Now let’s host the page on Github Pages!
To do that you should enter your package Github repository and go to Settings > GitHub Pages:

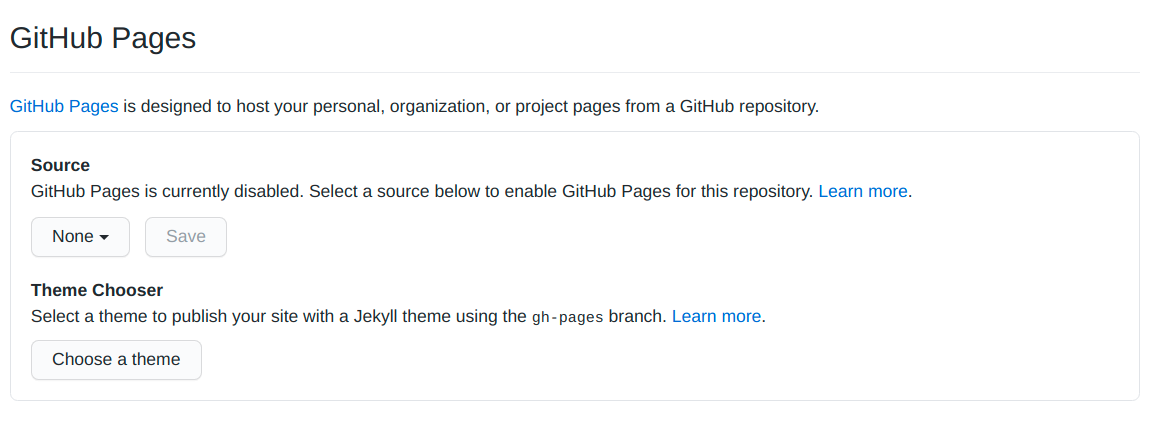
Now you only need to change the Source where will be the page structure (for me it is in the master branch and inside the docs folder).
The
pkgdownby default will create the docs folder for you when you runpkgdown::build_site()!

Done! Just add, commit, push and your package’s page will be online at: your_github_user.github.io/repository_name.
That is all
I hope someone finds this tutorial useful. As always your feedback is much appreciated, feel free to get in touch with me over social media! 😄