By Adson Costanzi Filho | November 25, 2020
Motivation
I had the idea of writing some “walking through” about blogdown, first because it was my first time using the package and I still have all the necessary steps fresh in my mind and second because probably I will need to have it all documented if I decided to refresh this blog one day. Of course, there are a lot of great tutorials about blogdown over the internet (the blogdown book for example), but maybe someone could find this one easier in some way…
This post is divided into 3 sections: How to start, How to customize and use, How to deploy. In the first section, you will find some hints on how to start the development of your own page using RStudio and blogdown, the second section is about the functionalities blogdown has to make our life easier and, the last one is the necessary steps to deploy your page.
How to start
The very first thing to do is install.packages("blogdown") to install the blogdown package. Once it is done you will need to install Hugo blogdown::install_hugo(force = TRUE) which is the static site generator blogdown uses (the force =TRUE parameter will update the Hugo version you may have installed).
Now that everything is installed we can start the development of our page. There are two ways to start: using the RStudio Addins or by command lines in the console, let’s try do it in both!
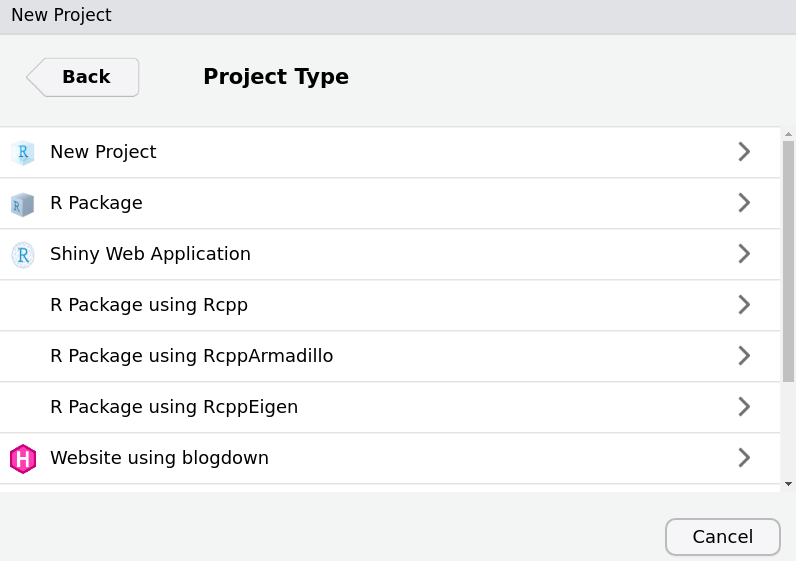
To start a new blogdown project over RStudio is very easy, you just need to jump in the menu File > New Project > New Directory and click in Website using blogdown option.
In the second screen you will need to choose a name for the project folder, the sub-directory of the project and the Hugo template (here is the fun part). Hugo has A LOT of templates available here, I strongly recommend you to try some of them and choose that one which best fits your expectations.
After choose the hugo template you just need to click in the “Download” button and you will be redirected to the template repository on Github.
Now you just need to fill the repository in the Hugo theme option and click in Create Project.
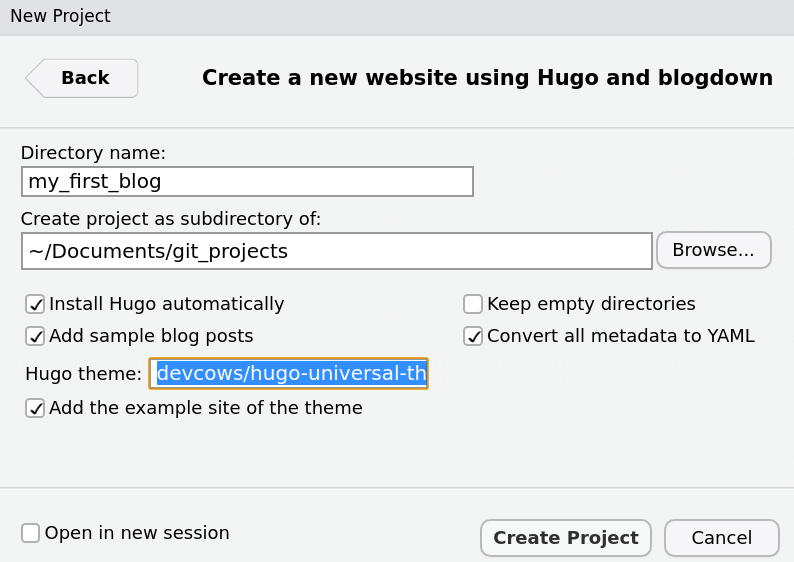
If you prefer to use the console (old school style) you just need to execute the blogdown::new_site(theme = "devcows/hugo-universal-theme") function and fill the theme parameter.
This page was developed using the Universal Theme
How to customize and use
If everything went well, RStudio should show you a preview of your site in the Viewer tab, and it should open a config.toml script. Inside your project folder blogdwon will create A LOT of folders, we will jump on that later.
The config.toml script gives you the option to customize your site without change anything in the CSS, HTML, or JavaScript (of course, if you want to deeply change your site you must have some knowledge in CSS at least). In this file you will find options to change the name of your site, images, some colors, etc. I encourage you to modify those options and see the results, once you save the file the Viewer tab will refresh your site automatically, so you will be able to see your changes.
Almost all templates have a README file with some explanations about the functionalities the template has, it will help you to use the theme properly (you can find it inside the themes folder).
The folders 😖
I know this folder structure can be very confusing at first, that is one of the reasons I decided to create this post (because I don’t know if I will remember all of it in the next week).
- content folder
The content folder is where all your posts and tabs must be stored, every time you write a new post this folder will be updated with the content of your post. We will talk more about the new posts later.
- static folder
The static folder is where you will update all the images you want to use in your page. You should replace the existing images presented in this folder with your own images.
Sometimes, it is necessary to clean the cache of your browser to see the new image you just changed, and restart your R over the RStudio menu Session > Restart R to see it in the Viewer tab.
- themes folder
The themes folder is the main folder of your template, here you can find the README file, CSS, JS, HTML, and you may find for some themes an Example folder. This is the place you should go if you want to change some structures of your page.
New posts
You probably want to create new posts on your page without pain. With that in mind, Yihui Xie, the responsible for the blogdown package, creates the function blogdown::new_post() (or over the RStudio Addins > New Post).
Before we start using it, there is another thing we can do to make this “new post” creation process even easier. Let’s change some Global options! To do that we need to modify and save the .Rprofile file, this is a script that is executed every time your R session is started. Here is the command to open this script: file.edit('.Rprofile'). Now we can set some default options for our new posts (take a look at here to see the other possible options).
# default extension and default author

options(blogdown.ext = '.Rmd', blogdown.author = 'Your Name')
In my case I choosed the .Rmd extention because I am more confortable writing using it, but you can, for example, choose .md, if you prefere. Now that we have everything configured the way we want, let’s start to write the post part😰. Once you start a New Post a standard .Rmd file will be created, now it is just about writing your content!
It is not necessary to Knit the file, the blogdown will render the post automatically when you save the file, and you can follow the updates in the Viewer tab on RStudio.
How to deploy
Now that everything is done on our page, it is time to deploy it. I will show how to do that using the Github Pages, but of course there are many other options (I just think this is the easier one..). To deploy our page we just need this 6 steps:
Create a Github account
Create a new repository
The name of your repository MUST BE your Github username + .github.io (USERNAME.github.io)
Clone this repository INSIDE your project folder
Execute the function
blogdown::build_site()
Before execute this function you should change the publishDir option inside the config.toml to the folder USERNAME.github.io (which is your Github repository).
publishDir = "USERNAME.github.io"PS: If your config.toml doesn’t have this option you can create it by yourself.
- Push the changes to your Github Repository
On the Terminal tab go inside the USERNAME.github.io folder using cd. Once inside that folder you just need to: git add, git commit -m "first deploy my blog", git push.
- Your page will be online on USERNAME.github.io
That is all
The blogdown package has MUCH MORE features than those presented in this post. To learn more about it I recommend you to read the blogdown book.
I hope someone finds this tutorial useful. As always your feedback is much appreciated, feel free to get in touch with me over social media! 😄